

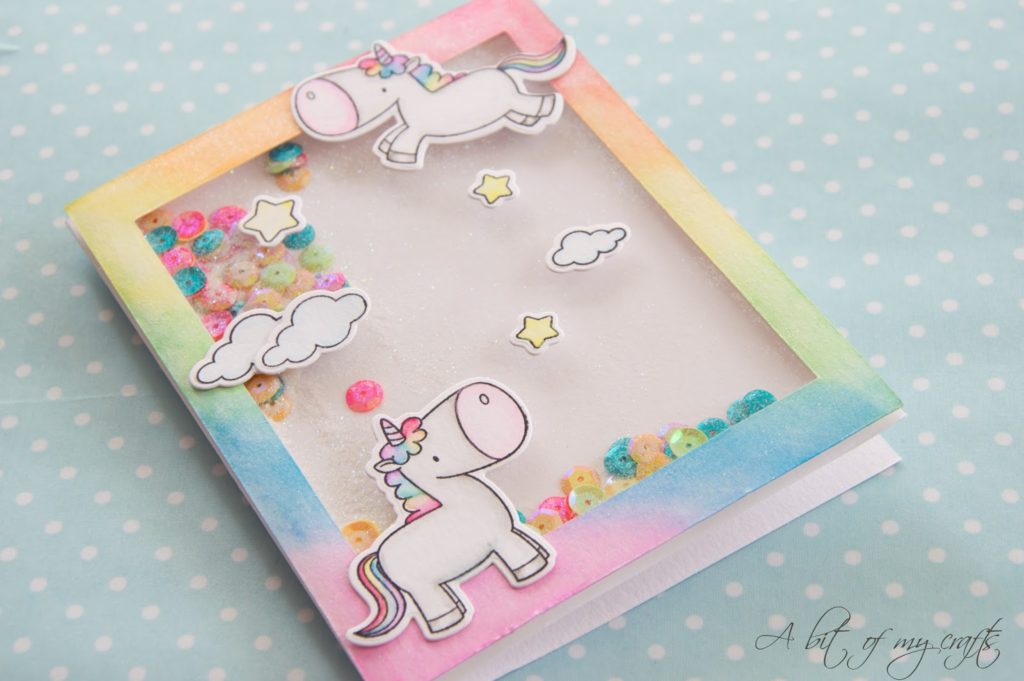
Hello everyone! Today I am back with the second card for this week. I was really inspired by the card making challenge at the Dani Peuss website, so I decided to create another colorful, fun project and try my hand at shaker card. It was my first time so I was a little nervous about the result. But in the end I am really happy about the way the card turned out, it is absolutely adorable! And with all those colorful sequin and the glitter…so much fun! But let’s have a look at the card making process.
The card base is a standard US A2 card (A6 in European format). For the frame of my shaker I took a sheet of Ranger watercolor paper, and I painted in a rainbow using my watercolors. I made sure to paint the rainbow transversally with respect to the card edges for some added interest. I then trimmed out the center using one of my Tonic Studios rectangular dies. Finally, I coated the frame thus obtained with my Spectrum Noir clear sparkle pen. A little piece of advice: with hindsight I would take this step at the very end of the cardmaking process, because I got my fingers coated in glitter while handling the card.
I stamped the images from the MFT magical unicorns stamp set using Ranger Archival ink in Jet Black on another piece of the same watercolor cardstock. I painted them in with watercolors and then die cut everything using the coordinating MFT dies.
I took a piece of acetate of the same dimension as my card front and adhered it to the back of the shaker frame using some double-sided tape. To make sure that the shaker elements would be able to move freely inside my card I backed the frame using two layers of foam tape. As for the shaker elements I used iridescent glitter by Knorr Prandell and a mix of sequins that I bought at a local store.
To assemble the shaker card I proceeded as follows: I took my card front, i.e. the panel with the acetate, and placed it face down on my working surface. I then added the glitter and the sequin mix, removed the backing paper from the foam tape, and adhered the card base directly to the panel.
I then positioned the stamped images on my card front, and attached them using double sided tape.
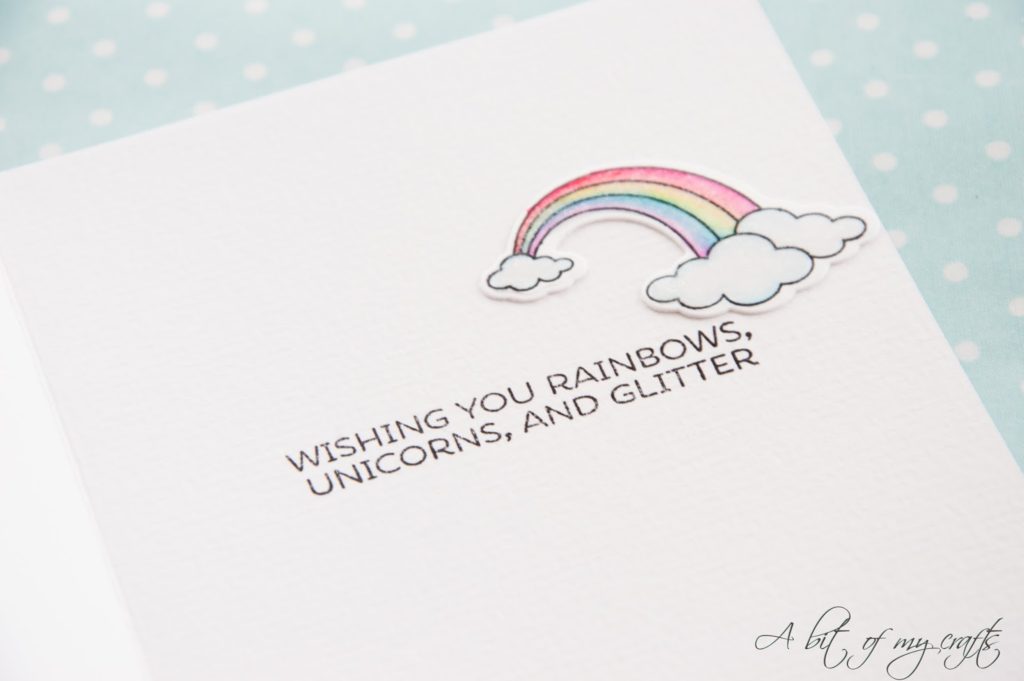
Because I liked the look of the front of my card so much and I wanted to keep it as clean as possible, I decided to stamp my sentiment directly inside the card. I chose the “wishing you rainbows, unicorns, and glitter” sentiment, because I felt that it matched my card perfectly. Also, because I had colored the image with the rainbow but not used it for my card front, I decided to add it above the sentiment. And of course had to coat it with my Spectrum Noir clear sparkle pen! 🙂 Here is a look at the inside of my card:
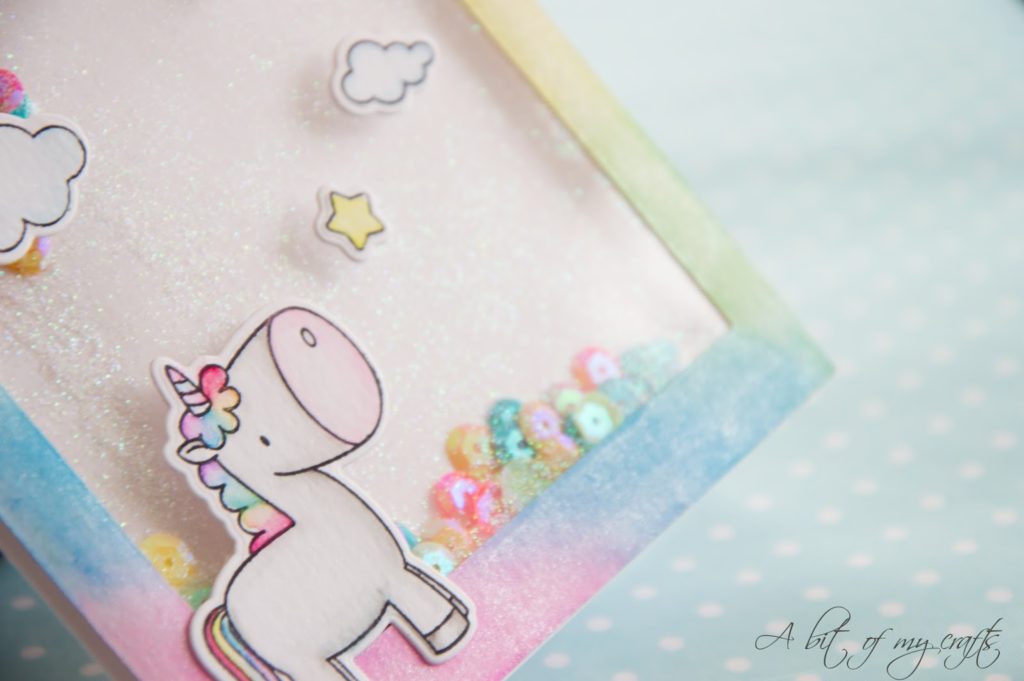
And finally one last close-up to show you how much sparkle is there in this card – I absolutely love it!

Ciao a tutti! Secondo post per questa settimana, di nuovo una card. L’ispirazione arriva ancora una volta dalla challenge sul sito di Dani Peuss, che mi ha spinto a creare un’altra card coloratissima! Ho deciso di provare a realizzare una shaker card, e poiché questo è il mio primo tentativo in assoluto, non ero sicura che sarei stata in grado di produrre qualcosa di decente 😀 In realtà sono davvero felice del risultato, che mi piace tantissimo per via dei colori e di tutto il glitter che ho utilizzato!
Ma diamo un’occhiata a come realizzare questa card. La base è in cartoncino bianco in formato A6. Per la cornice della mia shaker card ho utilizzato del cartoncino da acquerelli di Ranger, e ho dipinto un arcobaleno usando appunto degli acquerelli. Per rendere l’effetto più interessante ho fatto in modo che la direzione dell’arcobaleno fosse trasversale rispetto ai bordi della card. Ho poi tagliato via il centro utilizzando una fustella rettangolare da uno dei set di Tonic Studios e la mia Big Shot. Infine ho aggiunto del glitter alla cornice utilizzando la mia Clear Sparkle Pen di Spectrum Noir. Vi consiglio però di effettuare questo step alla fine, così eviterete che il glitter si trasferisca sulle vostre dita mentre maneggiate la card.
Su un altro foglio di carta per acquerelli ho timbrato le immagini del set “Magical Unicorns” di MFT, usando il tampone Archival Ink in Jet Black, anch’esso prodotto da Ranger. Le ho poi dipinte con i miei acquerelli e ritagliate usando le fustelle coordinate al set di timbri.
Per la finestra della mia shaker card ho incollato un foglio di acetato in formato A6 alla cornice realizzata precedentemente utilizzando del nastro biadesivo. Ho poi ricoperto la parte posteriore della cornice con due strati di nastro in schiuma biadesivo. In questo modo gli elementi della shaker card saranno liberi di muoversi all’interno della finestra.
Ho poi proceduto come segue: ho appoggiato la finestra della shaker card sulla mia superficie di lavoro, con la parte frontale rivolta verso il basso. Ho poi adagiato all’interno un mix di paillettes e del glitter iridescente di Knor Prandell. Ho rimosso la pellicola protettiva dal nastro in schiuma biadesivo, e fatto aderire la base della card alla finestra. Infine ho incollato al pannello frontale le immagini che avevo precedentemente stampato e dipinto, utilizzando del nastro biadesivo.
Poiché mi piaceva l’aspetto pulito e semplice che la card aveva a questo punto, ho deciso di timbrare il messaggio all’interno. Ho scelto la frase “wishing you rainbows, unicorns, and glitter”, perché mi è sembrata perfetta per questo progetto! Infine ho deciso di aggiungere l’immagine con l’arcobaleno vicino al messaggio, visto che l’avevo già dipinta ma non l’avevo utilizzata per il pannello frontale. E ovviamente non ho potuto resistere – ho dovuto aggiungere del glitter all’arcobaleno con la mia Clear Sparkle Pen di Spectrum Noir! 😛 Qui potete dare un’occhiata all’interno della card:
E infine una foto ravvicinata per mostrarvi l’effetto del glitter – io lo adoro!
E questo è tutto per il post di oggi. Spero che questo progetto vi piaccia quanto piace a me…vorrei che le foto riuscissero a riprodurre meglio i colori e l’effetto del glitter, perchè sono davvero bellissimi!
Un piccolo avviso prima di lasciarvi: non sarò a casa per le prossime due settimane, perché andrò a trovare la mia famiglia in Italia – evviva! Ho preparato alcuni post per non tenere il blog vuoto in questo periodo, e spero di riuscire a finirli e pubblicarli mentre sarò via. In ogni caso vi auguro una buona giornata e a presto!


Comments
Wow – we're so glad we could inspire you to create such a beautiful card! I love the soft look, and shaker cards are always a favorite of mine 😉
Thanks for playing along with danipeuss.de card challenge.
Reni
Author
Thank you Reni! I loved playing along!