

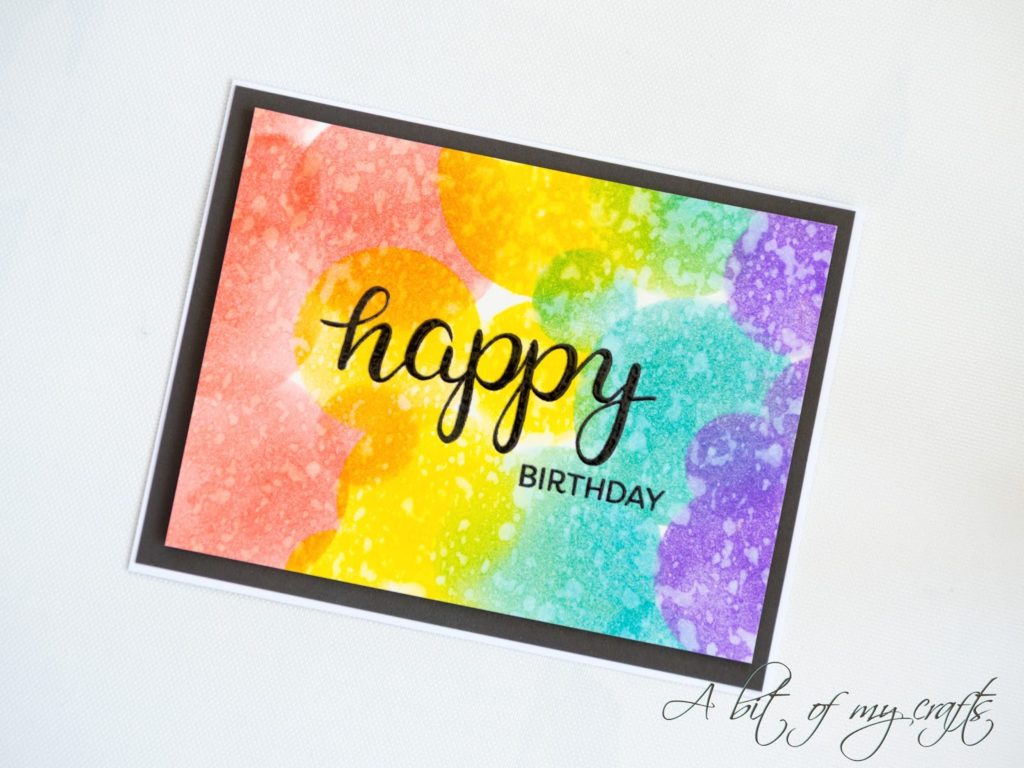
Hello everybody! A super quick card&post today, inspired by the Simon Says Stamp Monday and Wednesday challenges. The themes for these challenges are respectively “Make a Rainbow” and “Happy Birthday”, and I thought they could be combined into a very fun card!
I also recently got myself most of Tim Holtz’s distress inks, and I wanted to play with them a little bit. I wanted to go for a bokeh-like effect, and, because I didn’t have a circular stencil, I made my own: I used circle dies in different sizes to cut a piece of cardstock and use it as my stencil. Here is a picture to show you what I mean. 

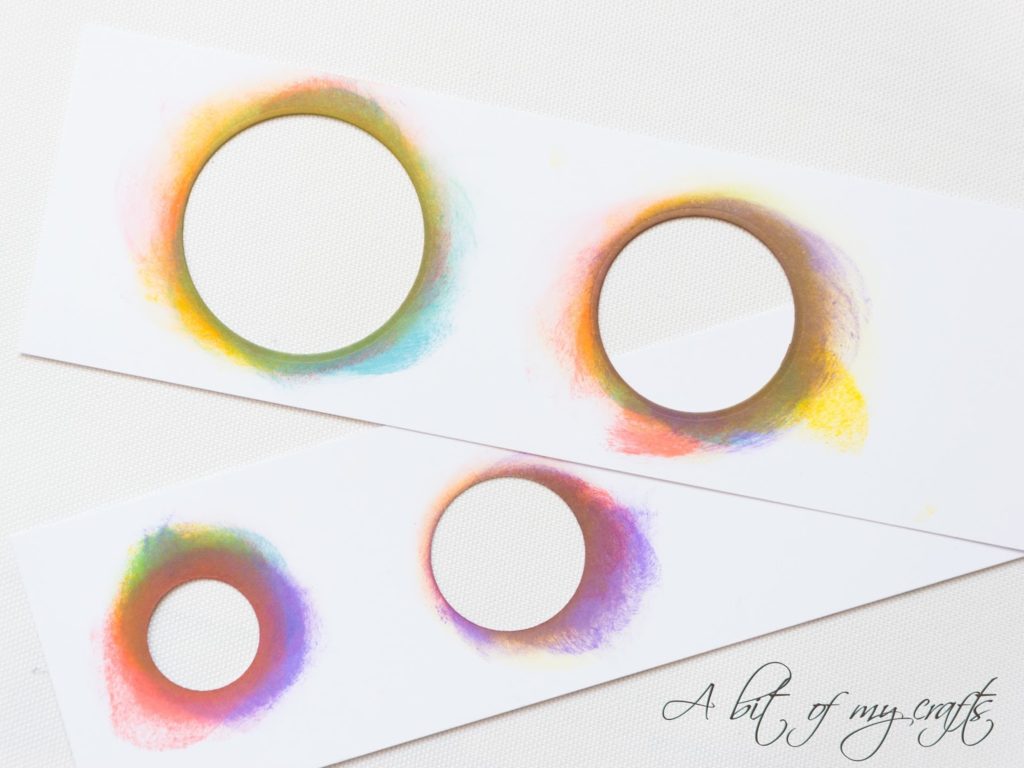
And because I used heavyweight cardstock I can keep using it for future projects!
I then took a sheet of Bristol Smooth cardstock cut to a standard A2-sized card, and used my distress inks, my custom made stencil, and a sponge blender to create a bokeh-rainbow. I used the colors Abandoned Coral, Mustard Seed, Broken China, and Wilted Violet. I made sure to use different size circles and to overlap them to create more interest. I also overlapped the colors between each other, to make the transition smooth and obtain the full rainbow color spectrum.
I then took a sheet of Bristol Smooth cardstock cut to a standard A2-sized card, and used my distress inks, my custom made stencil, and a sponge blender to create a bokeh-rainbow. I used the colors Abandoned Coral, Mustard Seed, Broken China, and Wilted Violet. I made sure to use different size circles and to overlap them to create more interest. I also overlapped the colors between each other, to make the transition smooth and obtain the full rainbow color spectrum.
I then sprayed the background with some clean water to re-activate the ink and used a paper towel to dry it out and lift away some of the color: this allows you to create those water-splotches on the card – so fun!
The sentiment comes from the Create a Smile Happy Days stamp set, which is really cool and versatile! To make it pop against the busy background I stamped it in Archival Jet Black ink by Ranger and then heat embossed it with clear embossing powder.
I trimmed down the card to be 4″ by 5 1/4″, so that I could frame it with some black and white cardstock. To create some dimension I used foam tape to adhere the front panel to the black one. And that’s it! Quite quick to make but I find it really really fun!
I hope you guys also enjoyed this post, and I will be back soon with another one! Have a great day!
CARD DI COMPLEANNO CON DISTRESS INK E STENCIL FAI DA TE
Ciao a tutti! Oggi sono di nuovo sul blog con un post e una card super veloci, ispirati alle Monday e Wednesday challenge sul blog di Simon Says Stamp.
I temi per questa settimana sono rispettivamente “Make a Rainbow” e “Happy Birthday”, e ho pensato di combinarli per creare una card allegra e divertente.
Inoltre di recente ho acquistato i Distress Ink di Tim Holtz, e non vedevo l’ora di provarli! Volevo cercare di produrre un effetto tipo bokeh, e, poiché non possiedo stencil al momento, ho deciso di realizzarne uno per conto mio: ho ritagliato del cartoncino con delle fustelle circolari di diverse dimensioni e l’ho usato come fosse uno stencil. Vi mostro una foto per rendere l’idea.
E, poichè ho utilizzato del cartoncino, posso continuare ad utilizzare il mio stencil per i miei progetti futuri!
E, poichè ho utilizzato del cartoncino, posso continuare ad utilizzare il mio stencil per i miei progetti futuri!
A questo punto ho preso un foglio di cartoncino Bristol Smooth della Strathmore, l’ho tagliato a 5 1/2″ 4 1/4″, e ho creato il mio background usando i Distress Ink, i miei stencil fai da te e un blender. Ho utilizzato i colori Abandoned Coral, Mustard Seed, Broken China e Wilted Violet. Ho cercato di sovrapporre i cerchi tra loro per produrre maggiore interesse nella card. Sovrapponendo tinte diverse inoltre si ottiene una transizione più morbida e si riproduce l’intero spettro di colori dell’arcobaleno.
Ho poi spuzzato dell’acqua sullo sfondo per riattivate gli inchiostri, e ho rimosso l’eccesso con della carta da cucina per creare delle macchioline. L’effetto mi piace davvero tanto!
Per il messaggio ho utilizzato stampi del set Happy Days di Create a Smile Stamps – è davvero un set bello e versatile! L’ho timbrato con l’inchiostro Archival di Ranger in Jet Black, e successivamente usato la tecnica dell’embossing a caldo per ricoprirlo con polvere da embossing trasparente.
Ho ridotto le dimensioni del pannello a 4″ per 5 1/4″ in modo da poter crare una cornice, per la quale ho utilizzato del cartoncino nero e del cartoncino bianco. Per aggiungere un tocco finale ho utilizzato del nastro in schiuma biadesivo per far aderire il pannello frontale alla base.
E questo è tutto! Una card semplice e veloce da realizzare, ma davvero allegra!
Spero che il post di oggi vi sia piaciuto, e tornerò presto con una nuova card! Buona giornata! 🙂


Comments
This is so cute! LOve the colorful circles and this contrast with black sentiment. Thank you for playing with Simon Says Stamp Monday Challenge!
Author
Thank you so much! I really enjoyed playing along!
super cute card! I am so glad you played along with us at simon says stamp wednesday challenge!
blog-paperie blooms
ig-2klines
sparkle & shine, kindness *~*
Author
Thank you Teresa! 🙂