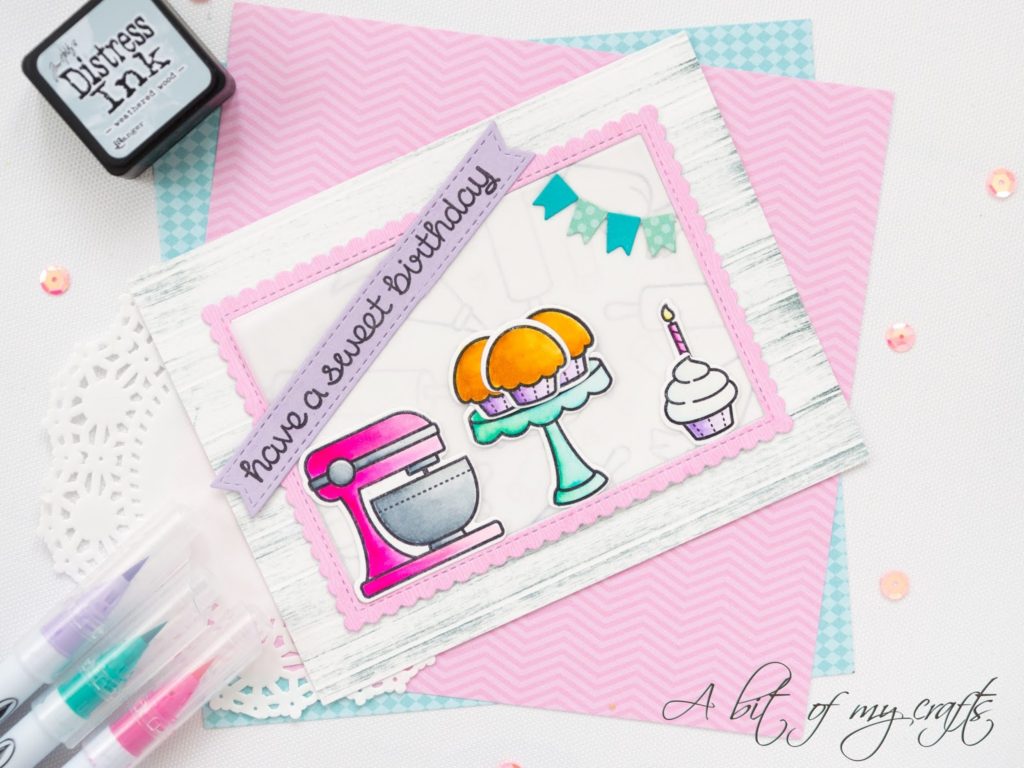
Hello everyone! Today I am back with a card I made for my guest designer spot over at the Dani Peuss blog. I was really excited to be selected as a guest designer for their card making challenge, and I really wanted to make something special. So I wondered and wondered, until I stumbled across a video by Gina K in which she shows how to make a woodgrain pattern using inks. And because I am a foodie 😀 I immediately thought about those distressed wood plank backdrops which are very popular in food blogs these days, and I thought I wanted to try to reproduce the feel of those marvelous food pictures. And because the theme of the challenge is Happy Birthday, the Lawn Fawn Baked with Love set was just perfect for the card I had envisioned! Anyways, enough chatting, and let’s see how to create this card!
For the woodgrain background I used Bristol Smooth cardstock by Strathmore cut to a standard US A2 card and my mini Distress Ink cube in Weathered Wood. To create the feel of wood planks I created score marks in my card base at a distance of 1/2″ from each other. After that I took my distress ink mini cube and I applied it directly to the paper creating very light strokes in the same direction as the score marks. For the full tutorial on how to create such an effect you can check out
Gina K’s video.
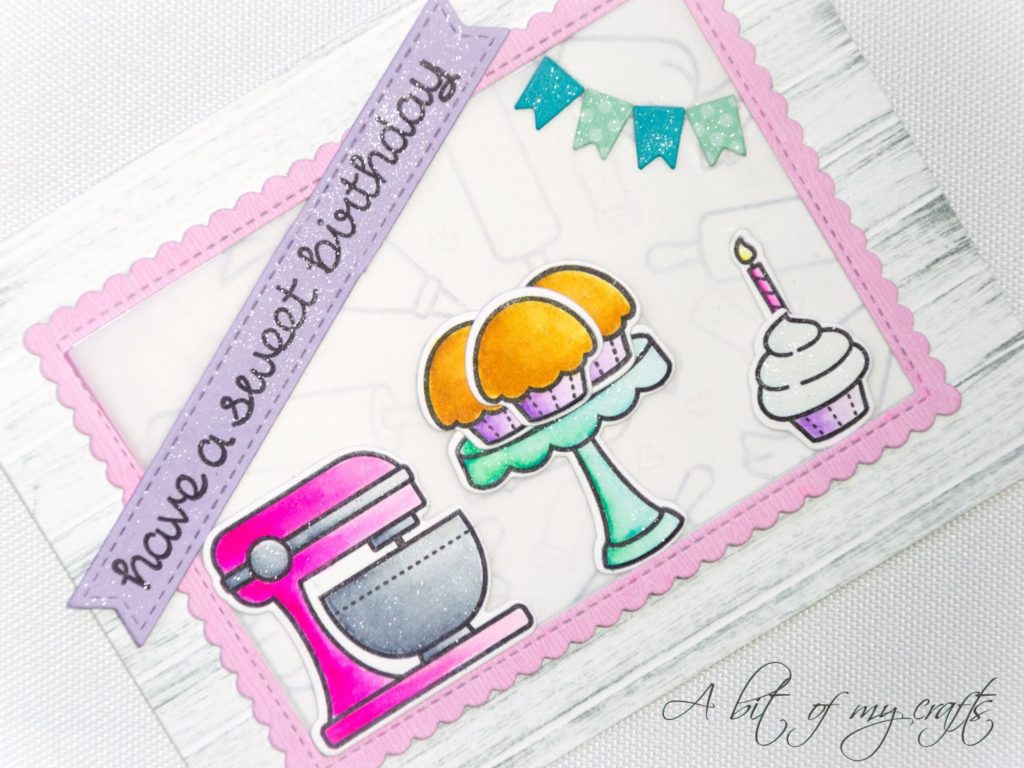
While my background was drying I took some more Bristol smooth cardstock and Ranger Archival Ink in jet black and I stamped images from the Lawn Fawn Baked With Love set. I used my Zig Clean Color Real Brush markers and a waterbrush to color them in. Here is the list of the markers I used:
Kitchen machine: 25, 26, 91, 92
Cake stand: 42, 36
Cupcakes on the stand: 61, 64, 803, 83
Cupcake with frosting: 302, 36, 803, 83
Candle: 25, 50
I then cut all the images using the coordinating dies.
To frame the elements of my card I decided to take the MFT Stitched Scalloped Rectangle Frame dies to cut out some pink patterned paper from the Doodlebug Spring Things 6×6″ paper pad. I found this paper to be really perfect for this card: the very subtle wood pattern that is printed on the paper matches the custom background I created really perfectly. Using the same rectangle frame dies I cut some Bristol Smooth cardstock and used the inner rectangle to create my own custom patterned paper. I chose some different images from the same Lawn Fawn set and I stamped them with Versamark Ink in a random pattern. Unfortunately my Versamark ink pad was a bit contaminated, so the images came out slightly darker than I wanted. But there is an easy fix: I took some Vellum and laid it on top of my background to soften it up. And I am really really happy with the result! For the sentiment I used the Stitched Sentiment Strips die set by MFT dies and the “have a sweet birthday” sentiment again from the Lawn Fawn baked with love set. For the little banners I used the Lawn Fawn Stitched Journaling Card die set, some Neenah cardstock from the Astrobright collection for the solid banners, and Doodlebug patterned paper from the Spring Things pad for the banners with the polka dots. I then adhered everything in place using Ranger Multi Medium Matte. And, as a final step, I added some glitter with my Spectrum Noir clear glitter pen. And here is a picture where you can see how sparkly this card is! I love it!
And that’s it for today’s post! Head over to the
Dani Peuss website to check out this week’s challenge and join the fun! I really hope you guys enjoyed this post and liked my card, and I will be back with another one soon! Ciaooo!
SFONDO EFFETTO LEGNO FAI DA TE FEAT TIMBRI LAWN FAWN E MARKER SPECTRUM NOIR
Ciao a tutti! Oggi torno sul blog con una card che ho realizzato come guest designer per il blog di
Dani Peuss. Sono stata davvero felice di essere scelta come guest designer per la loro challenge, perciò volevo creare qualcosa di davvero speciale. Ho pensato a lungo a che card realizzare, finché non ho trovato un video nel quale Gina K insegna come realizzare un effetto legno utilizzando del cartoncino e degli inchiostri. E, dato il mio passato da food blogger, ho subito pensato alle bellissime immagini di food con quei meravigliosi sfondi realizzati in legno, e ho deciso di provare a riprodurre quel tipo di atmosfere nella mia card. Inoltre, poiché il tema della challenge di per le prossime due settimane è buon compleanno, il set Baked with Love di Lawn Fawn era semplicemente perfetto per la card che avevo in mente! Ma bando alle ciance e vediamo come fare per realizzare questa card!
Per lo sfondo effetto legno ho utilizzato del cartoncino Strathmore Bristol Smooth precedentemente tagliato a 4.25″ per 5.5″, e il mini Distress ink cube nel colore Weathered Wood. Per creare le tavole sul mio sfondo ho creato delle scanalature nel cartoncino a una distanza di 0.5″ l’una dall’altra. A quel punto ho preso il mio mini Distress Ink cube e l’ho passato direttamente sul cartoncino in maniera molto leggera, e nella direzione delle scanalature. Se volete vedere come realizzare questo sfondo vi consiglio di guardare il video di Gina K.
Mentre lo sfondo era ad asciugare, ho preso un altro foglio di cartoncino Bristol e ho stampato le immagini del set Baked with Love utilizzando inchiostro Archival Black ink di Ranger. Per colorare le immagini ho utilizzato i miei Zig Clean Color Real Brush markers e un waterbrush. Questa è la lista dei marker che ho utilizzato:
Planetaria: 25, 26, 91, 92
Alzatina: 42, 36
Cupcakes sull’alzatina: 61, 64, 803, 83
Cupcake con Frosting: 302, 36, 803, 83
Candelina: 25, 50
Ho poi utilizzato le fustelle in coordinato per ritagliare le immagini.
Per incorniciare gli elementi della mia card ho deciso di utilizzare le fustelle del set Stitched Rectangle Scallop Edge Frames di MFT per ritagliare della carta decorata dal paper pad Spring Things di Doodlebug. Trovo che il design della carta decorata si sposi davvero bene con lo sfondo effetto legno che ho creato per questa card. Utilizzando le stesse fustelle ho anche ritagliato un altro foglio di cartoncino Bristol e ho utilizzato il rettangolo così ricavato per creare la mia carta decorata personalizzata. Ho scelto alcune delle immagini dal set Baked with Love che non avevo utilizzato fino a quel punto, e le ho stampate in maniera casuale sullo sfondo utilizzando il mio inchiostro Versamark. Purtroppo il tampone era contaminato con dell’inchiostro nero, perciò le immagini sono risultate più scure di quanto volessi. Ma il problema ha una soluzione semplice: ho utilizzato della carta vellum per attenuare un po’ lo sfondo. E il risultato mi piace davvero tanto!
Per il messaggio ho utilizzato una delle fustelle del set Stitched Sentiment Strips di MFT e il messaggio “have a sweet birthday” dallo stesso set Baked with Love. Per i festoni ho usato le fustelle del set Stitched Journaling Card, del cartoncino dalla collection Astrobrights di Neenah per i festoni turchese, e uno dei fogli del paper pad Spring Things di Doodlebug per i festoni con i pois. Ho poi incollato tutti gli elementi con il Ranger Multi Medium Matte. E, come step finale, ho aggiunto del glitter con la mia penna glitter Spectrum Noir. Nella seconda foto potete vedere l’effetto del glitter sulla card…Io lo adoro!
E questo è tutto per il post di oggi! Date un’occhiata al sito di Dani Peuss per la challenge in corso, e partecipate anche voi! Spero davvero che il post e la card di oggi vi siano piaciuti, e tornerò presto con un altro progetto carino! Ciaooo! Like this:
Like Loading...