

Hello everyone! Today I am back with a quick and easy card I made for the current sketch challenge over at the My Favorite Things blog. This one was really fun to make, and I loved how smoothly it came together: I rarely have a precise idea of what my cards are going to look like when I sit at my craft table, but this time, because I was following a sketch, the whole card making process was much more structured and ordered than what I am used to! And I must admit that it made the video editing much easier! 🙂
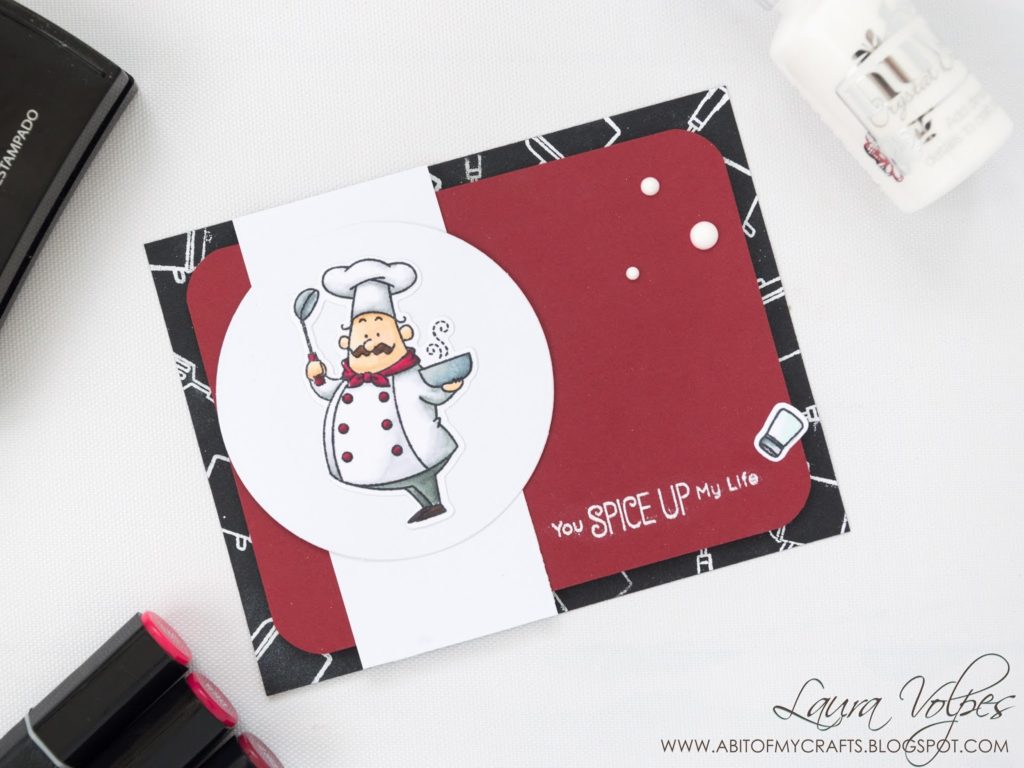
For this card I decided to use one of the stamps from the My Favorite Things Recipe for Happiness set. I really love this little chef: besides card making, in fact, my other passion is cooking, so I could not pass on this one – I had to have it in my stash! 🙂
I stamped it on some Neenah Solar White cardstock with Memento Tuxedo Black ink and I colored it in using my Spectrum Noir markers. If you want to know which markers I used, they are all listed in the video and at the end of this post. Also, because Spectrum Noir markers are not sold individually, I will also link to the specific bundle they come in – I hope this will be useful for those who are interested in these markers. 🙂
I stamped it on some Neenah Solar White cardstock with Memento Tuxedo Black ink and I colored it in using my Spectrum Noir markers. If you want to know which markers I used, they are all listed in the video and at the end of this post. Also, because Spectrum Noir markers are not sold individually, I will also link to the specific bundle they come in – I hope this will be useful for those who are interested in these markers. 🙂
After having colored my fun little chef, I cut it using the dies that coordinate with the set. I used my beloved Tonic Studios Guillotine Trimmer to cut my card base from some Core’dinations Smooth black cardstock. I also cut some wine red cardstock to 3 3/4″ by 5″, and I rounded the corners using my WeR Memory Keepers corner chomper. I have a little tip in my video on how to always get perfectly symmetrical corners using the corner chomper, for those who, like me, obsess over small details! 😛
To follow the sketch I also cut a stripe and a circle out of some white cardstock. For the circle I use one of the dies from the Tonic Studios Layering Circles set: this was actually one of the first die sets I ever purchased 🙂 It was not very expensive and it comes with a lot of dies, so I thought it would be a good starting point 🙂
At this point I decided to add some heat embossed detail to my card: I stamped some of the smaller images in the set on my black card base using Versamark ink in a random patter, I coated them with my Ranger white embossing powder, and I heat set everything using my heat gun. I repeated the same steps to heat emboss the sentiment on the wine red cardstock.
At this point I could go ahead and assemble my card: I used some fun foam to adhere the front panel to my card base, so that I would compensate for some of the warping that had occurred during the heat embossing process. I used my Tonic Studios Funky Tape Runner to adhere the white strip and the circle, and some Tombow Mono Multi glue to adhere my chef in place. For some finishing touches I added some Nuvo Crystal Drops in Simply White to the top right of my front panel, and the little salt dispenser just above my sentiment.
You can watch the whole card making process in the video below.
And don’t forget to let me know what you think about it!

The items marked with a * were sent to me for free for designing purposes.
When possible, affiliated links are used. This means that if you make a purchase through one of these links, I will get a small commission at no additional cost to you. The money I earn this way goes towards running this blog and my YouTube channel and allows me to keep sharing inspiration with you. Thank you for your support! 💖
When possible, affiliated links are used. This means that if you make a purchase through one of these links, I will get a small commission at no additional cost to you. The money I earn this way goes towards running this blog and my YouTube channel and allows me to keep sharing inspiration with you. Thank you for your support! 💖


Comments
Very nice card thanks for sharing!!!
Author
Thank you!
Love your cute chef. Nice clean and simple card. Thanks for sharing