

Hello guys! Today I am back with a card I made for the current Color Throwdown Challenge using the emboss resist technique with Distress Inks.
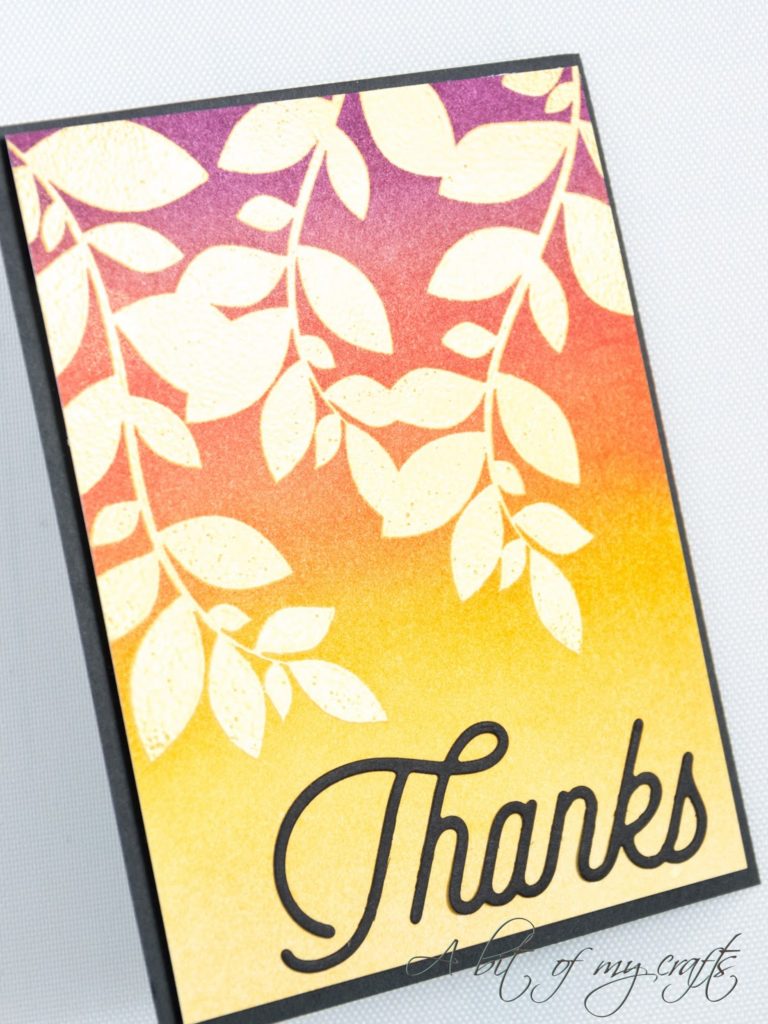
This basically means that you stamp your images with Versamark ink, coat them with embossing powder, heat set the powder and just at that point you come in with your Distress Inks. The parts of your card that have embossing powder will resist the ink, and this allows to create beautiful effects. I had also shot a video showing this technique but unfortunately I forgot to set the focus properly, so I cannot use any of the clips…quite a bummer, uh? 🙁
Anyways, I learned my lesson and I am still left with a beautiful card!
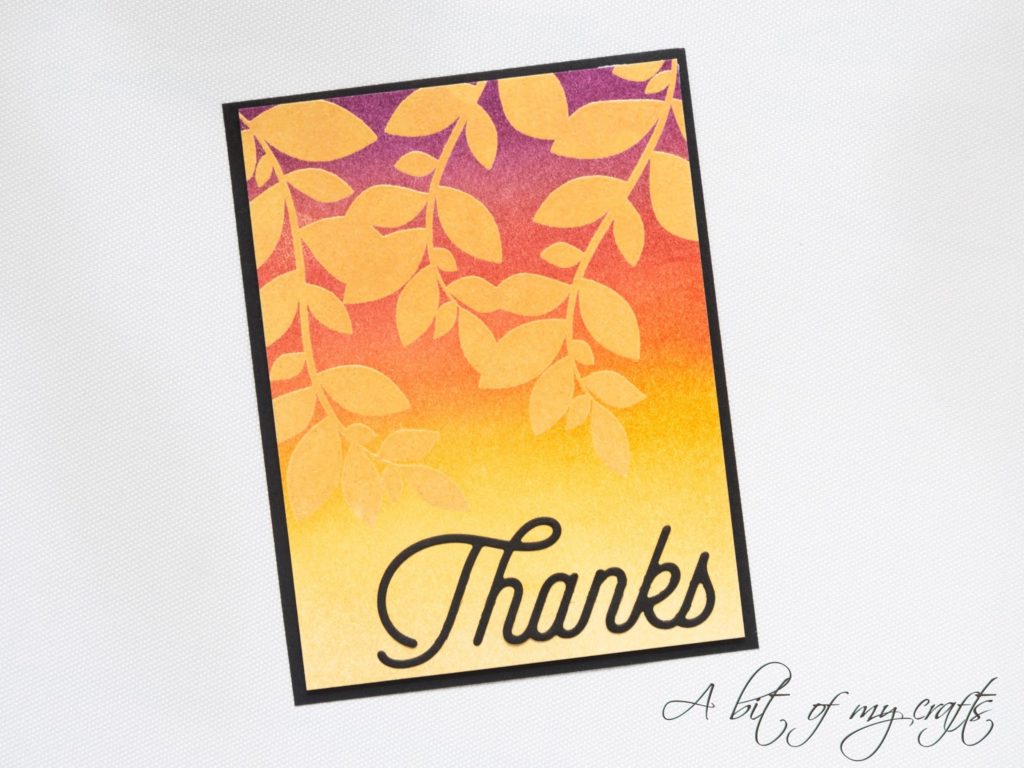
As a first step I took the Clustered Leaves stamp by Create a Smile, inked it up with Versamark ink, and stamped it on some Strathmore Bristol Smooth cardstock cut at a standard US A2 size. I chose this cardstock because it is perfect for blending distress inks. I then coated my images with gold embossing powder and heat set everything with my heat tool.
To go with this week’s colors for the challenge I used Distress Inks in Seedless Preserves, Fired Brick, Wild Honey and Scattered Straw, and I blended them using the Ranger blending tool. I let everything dry and then trimmed the panel a little bit, because I decided to frame it with some black cardstock. From the same black cardstock I cut the Thanks sentiment from the Twice the Thanks MFT Die-Namics set and I glued it down with liquid glue. Lastly, I mounted the front panel on the card base with some foam tape. And that’s it! That’s my card for today! I really really like the result: the gold embossing powder matches perfectly with the background I created, and I am in love with this color combination! Check out how pretty it looks when it catches the light!
I hope you guys like it too and I will be back soon with another card! Ciaooo!
TECNICA DELL’EMBOSS RESIST CON DISTRESS INK TIMBRI CREATE A SMILE
Ciao a tutti! Oggi torno sul blog con una card che ho realizzato per la Color Throwdown Challenge di questa settimana, utilizzando la tecnica dell’emboss resist con i Distress Ink. Questa tecnica consiste nel timbrare le immagini scelte con inchiostro Versamark, ricoprirle con polvere da embossing, effettuare l’embossing con una pistola a caldo, e solo a quel punto applicare il colore con i Distress Ink. Le aree della card in cui abbiamo effettuato l’embossing saranno impermeabili agli inchiostri e vi permetteranno di creare degli effetti bellissimi. Avevo filmato un video per mostrarvi questa tecnica, ma purtroppo ho dimenticato di impostare il fuoco correttamente, e non posso utilizzare nessuna delle clip… Che delusione! 🙁
Beh, che dire…ho imparato la lezione!
Ma veniamo alla card. Per iniziare ho inchiostrato il timbro Clustered Leaves di Create a Smile con inchiostro Versamark e l’ho stampato su del cartoncino Bristol Smooth della Strathmore, che avevo precedentemente tagliato a 4 1/4″ per 5 1/2″. Ho scelto questo supporto perché è perfetto per ottenere un’effetto sfumato con i Distress Ink. Ho poi ricoperto le immagini con della polvere da embossing dorata, e l’ho sciolta con la mia pistola a caldo. Per seguire la palette di questa settimana ho utilizzato i Distress Ink nei colori Seedless Preserves, Fired Brick, Wild Honey e Scattered Straw e li ho sfumati utilizzando il blending tool di Ranger. Ho lasciato tutto ad asciugare e ho poi leggermente ridotto le dimensioni del pannello, poichè ho deciso di incorniciare il tutto con del cartoncino nero. Ho ricavato il messaggio “Thanks” dallo stesso cartoncino nero con una delle fustelle del set Twice the Thanks di My Favorite Things. Ho incollato il messaggio con della colla vinilica e ho montato il pannello frontale alla base della mia card utilizzando del nastro in schiuma biadesivo.
E questo è tutto! Il risultato mi piace davvero molto: la polvere da embossing dorata si sposa perfettamente con la palette di colori che ho utilizzato, che peraltro trovo davvero meravigliosa! Guardate che bell’effetto si ha quando si riesce a catturare la luce!
E questo è tutto! Il risultato mi piace davvero molto: la polvere da embossing dorata si sposa perfettamente con la palette di colori che ho utilizzato, che peraltro trovo davvero meravigliosa! Guardate che bell’effetto si ha quando si riesce a catturare la luce!
Spero che anche a voi piaccia la mia card di oggi, e tornerò presto con un altro progetto carino! Ciaooo!


Comments
Great technique and gorgeous card!!
Author
Thanks a lot, Cindy, for stopping by and for your nice words!
Love your card…great color combo.
Author
Thank you, Laura! 🙂 I am glad you like it, and thanks for stopping by!
The gold leaves are gorgeous with the sponged background!! So happy you joined us at CTD!
Author
Thanks a lot, Vickie! It's always fun to play along!